BREAKING NEWS: A revolutionary approach to achieving flawless skin tones in photography has just been unveiled by renowned expert Needham, offering a detailed five-step Lightroom workflow. This game-changing method promises to transform how photographers handle skin color, making it more accurate and emotionally resonant.
In an era where digital photography is ubiquitous, understanding how sensors interpret light and color is crucial. Needham highlights that many portraits appear overly green or pink due to camera sensor color bias. This bias can distort skin tones even under optimal lighting conditions. His latest video tutorial, released earlier today, meticulously outlines how to address these issues before any creative edits are made.
Needham emphasizes the importance of selecting the right camera profile as the very first step. He compares various profiles, including Adobe Color and Adobe Standard, revealing that Adobe profiles are the most versatile for matching skin tones across different camera brands. This crucial insight can significantly enhance the quality of portraits, allowing for a neutral foundation that facilitates further color adjustments.
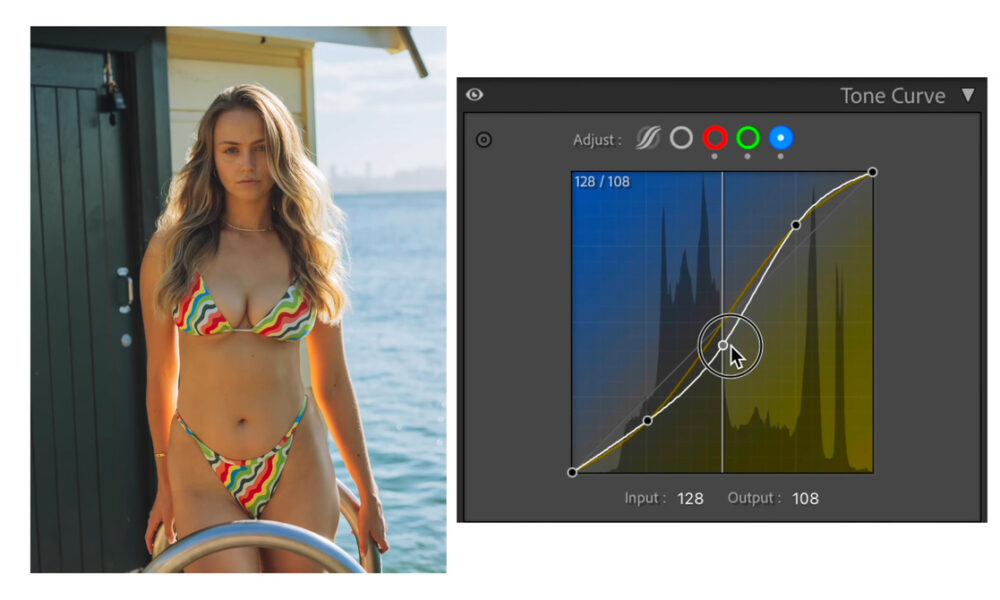
The second half of the tutorial dives deeper into the technical aspects of color correction. After establishing white balance, Needham expertly navigates the RGB tone curve. He demonstrates how subtle adjustments can profoundly impact skin tone and emotional expression in portraits. For instance, lowering blue adds warmth, while lifting red creates a soft peach glow. This method highlights that color correction is not merely guesswork but rather a precise science that can dramatically improve portrait quality.
Next, Needham tackles color calibration—a frequently misunderstood aspect of Lightroom. He reframes this process as “sensor tuning,” advising photographers to adjust the red and green primaries to correct initial color discrepancies. The result is a more natural, healthy skin tone that transcends variations across different ethnicities.
After calibration, he utilizes the HSL panel for fine-tuning, tweaking hue, saturation, and luminance. Even a minor increase in orange luminance can significantly enhance skin appearance, resulting in a clean, soft finish without sacrificing depth.
Needham’s method stands out because he communicates the rationale behind each adjustment, making his process both educational and actionable. His insights merge color theory with digital tools, underlining that the interplay of red, green, and blue is essential for crafting impactful imagery.
This comprehensive workflow encourages patience and precision, rewarding photographers who invest time in mastering these techniques. By grasping the logic behind each step, creators can ensure consistent, realistic skin tones across all portrait systems.
For those eager to elevate their photography game, the full tutorial is available now. Don’t miss out on this opportunity to enhance your skills and deliver stunning, lifelike portraits.
Alex Cooke, a Cleveland-based photographer and meteorologist, highlights the significance of these techniques for anyone looking to improve their photographic artistry.
Stay tuned for more updates as this essential Lightroom workflow gains traction in the photography community!